In the steel manufacturing world, the X-ray thickness gauge serves as a tool to determine the thickness of steel coils, billets, sheets, and plates during manufacturing operations. These instruments inspect metallic products for consistency, quality, and regulation adherence. They determine the thickness of a formed metallic material without any technological adjustments or destructive processes. These instruments are able to work by the detection and absorbance of X-rays through the desired metallic substance. They make precise thickness measurements and monitor the X-rays’ fluctuation through the material while employing a linear attenuation coefficient.
The change in instrumentation’s signal generation due to the level of radiation absorbed over an interval of time is directly related to and can be transformed into describing the substance’s thickness. The previous sentence only holds to be true as long as the chemical composition and material density throughout the entirety of the material under inspection is consistent. Radiation/x-ray measurement devices also have the advantage in terms of accuracy over isotope readings.
X-ray thickness gauges are also the most common type of gauges used in industry due to their accuracy. X-Ray gauges are far less stringent of a product from an EHS/regulatory standpoint which make them very attractive and versatile for many customers.
From raw resources to completed goods, monitoring the thickness of metals like lightweight aerospace-grade Aluminum and stainless steels has become one of the more practical and effective strategies for increasing the efficiency and quality of manufacturing processes as well as boosting the overall yield of sales and product.
Whether you operate a steel mill with particular blast heating systems, an electrically powered arc furnace (generally abbreviated as EAF), or a slitting/cut-to-length enterprise, production experimental setups and automation technologies/instrumentation like x-ray thickness gauges are critical to satisfying your customers’ demands.
Commercial X-Ray thickness gauges made their debut in the earlier 1950s. At that time, The Sheffield Corporation introduced Measuray instrument products like the thickness gauge. A company called Bendix A&M bought Sheffield Corporation in 1969, while Measuray Corporation was formed as a spinoff ten years afterward to manufacture, service, and support the X-Ray product portfolio. The sector has expanded the following decades with significant advancements in system innovation, operations, components, and auditing & reporting capabilities.
Global Gauge Corporation (commonly known as GGC or Global Gauge) was created in 1999 and purchased Measuray’s legacy resources. GGC launched the inaugural PLC-based instrument called Perfecta X-Ray thickness gauge shortly after the acquisition of the said legacy rights.
Global Gauge Corporation has been running up against some of the industry’s other well-established competitors throughout the years such as PDM Technologies and ESC Resources. Global Gauge Corporation has expanded its equipment portfolio and has supplied hundreds of new and upgraded gauges in the subsequent years.
GGC’s X-Ray based product portfolio is now widely acknowledged as the professional benchmark for non-contact measurement assessment technologies in rolling plants.
At Global Gauge Corporation, X-Ray Thickness Gauges for steels and other metals are well manufactured to the highest of quality standards in order to provide the best accuracy and usability along with a plethora of technical support.
Global Gauge’s X-Ray Coating Weight and Thickness gauges provide accurate and reliable solutions throughout the comprehensive flat-rolled metals and steel manufacturing processes.
Measurement Equipment for Hot Strip
The Thickness Gauges for Hot Strip Mills manufactured by Global Gauge are often encased in stainless steel C-Frames and typically include rugged sensors as well as cooling systems to provide accurate thickness measurements in the hardest operational environments. Our designs are available as single gauges or in multiple configuration groupings.
For the multi-configuration example, this may include one scanning-point gauge while the other gauge is a center-point gauge for automatic gauge control. The scanning packages provide our customers with visual representations of their profiles as the material travels through the slots and frames in the manufacturing equipment.
It is unimaginable nowadays to distinguish between roentgenometry and roentgenoscopy methodologies seeing that both types utilize digital transducers for initial signal encoding, processing, radiometric development, and testing consequence acknowledgment. These methodologies are not only computer based but they also demonstrate certain aspects of quantified measurements styles that are used heavily in industry by simplifying the interpreted results.
A typical application of the roentgenometry technique is popularly named X-ray thickness gauging. This type of measurement device enables the accurate measurement of the thickness of metallic items. It provides effective ways to discover material properties and characteristics such as atomic number (number of protons in the nucleus or number of electrons revolving in shells of the atom outside the central nucleus).
Comparing this roentgenometry approach to the isotopic approach, the new measurement technique is non-invasive, contactless, and more environmentally friendly. As an indirect measuring methodology, it has several shortcomings in terms of the reliability of results obtained when the chemical composition or density of the substance being tested is inconsistent.
Stable isotope generators imply that such specifications for X-ray equipment should be pursued. New ionizing radiation sensors and detectors, the heterogeneous and multimodal/multi-camera technology with energy responsiveness, have been developed to achieve the required precision for X-ray thickness gauge measurements.
This option enables not only the expansion of the vibrant spectrum of density characteristics, thickness values, and the correction of errors caused by the destabilization of X-rays, but also the avoidance of modifications in the emission bandwidth (the recrystallization of anodes and metal atom accumulation at the x-ray chamber frame) with respect to prediction accuracy.
Nowadays, the primary issue that emerges during the construction of x-ray thickness gauges is the requirement to stabilize the stream of an inflexible probe’s electromagnetic spectrum with respect to its intensity. It is vital to restrict the spectrum concentration of radiation flux as energy passing through an element under test alters its spectral range.
This altering brings forth the modification of correlation coefficients for changes to occur to a substance’s chemical makeup. Stabilizing an X-ray circulation is often accomplished by using voltage and current feedback impulses on an X-ray tube. Overall, this approach is incapable of measuring variations in the static electric fields that extend out from the insulating material of an X-ray duct or changes within the configuration of electrodes due to temperature variations.
The cathode discharge diminishes over time while the anode layer recrystallizes. Occasionally, particularly in the case of the X-ray thickness measurement and gauging, it is critical to avoid fluctuations in the current flow’s amplitude and intensity.
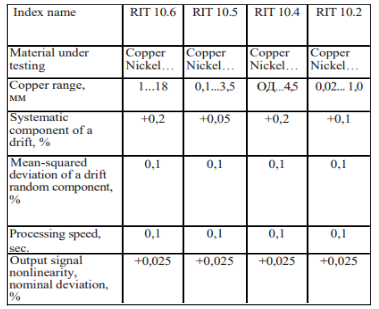
Gamma radiation’s mass degradation factors are energy-dependent when the thickness and width of nonferrous metallic materials with differing effective atomic numbers changes. To address the issue, a mechanism for automatically correcting spectral volatility and probing irradiation flux sources was devised for GGC’s family of thickness gauges. Table 1 below illustrates the installation of thickness sensors on mills during the nickel band production manufacturing processes.
More specifically, it details the differences in such aspects like percent drift, processing speed, and non-linearity. X-ray thickness gauges enable the continuous measurement of a rolled metal sample’s depth and thickness profile during the manufacturing and assembly process. The precision of 0.1% to 0.05% is necessary for measurement to ensure high quality.
Amidst the simplicity and efficiency of working with monoenergetic output emission spectrum, X-ray thickness gauges replaced isotope technologies from the realm of rapid industrialization. X-ray tubes with an amalgamation of metal and ceramic have been typically employed in thickness gauges, which utilize a highly stable and consistent high voltage source providing the feed.
The advancement of sensors and detectors and their ability to be used as heterogenic “camera” systems with energy resolution enabled the creation of a comprehensive (and very effective) class, which is composed of x-ray thickness gauges. This enables the usage of thickness gauges on almost any form of metallic and non-metallic rolled stock.
The new generation of x-ray thickness gauges and instruments features the accuracy of better than 0.1%. They are produced using the proven system architecture developed at GGC. A thickness gauge configuration method was used in chokepoints of the technological operation when constructing a high-precision rolling inventory for nickel coin manufacturing (see Table 1). Table 1 also contains the primary specifications for such thickness gauges. The primary attributes of thickness gauges for cold-rolled material are listed in Table 1 below.
Table 1: Main Characteristics of Cold-Rolled Stock Thickness Gauges

Non-contact radio-isotope or X-ray thickness gauges are available on the market today. However, if the gauge’s actual measurement is to be employed in a confined loop management system or in an automatic gain management system, there is only one alternative: X-rays. A high-voltage X-ray source emits almost 1000 times the amount of radiation as commercially accessible isotopes.
Based on the statistical characteristic of radiation monitoring, observations with a higher number of photons over time have a higher SNR (signal to noise ratio), which usually guarantees a more precise measurement. When comparing X-ray and isotope sensors, the decibel level of an isotope detector is approximately 20 to 30 times greater than that of any given X-ray sensor using the same average time interval.
At that degree of statistical noise, modest changes in the dimensions, such as the thickness of the signal information, are lost in the signal’s noise. While it may be possible to improve the movement by using additional isotope pellets, regulative and administrative safety concerns make this an impractical approach.
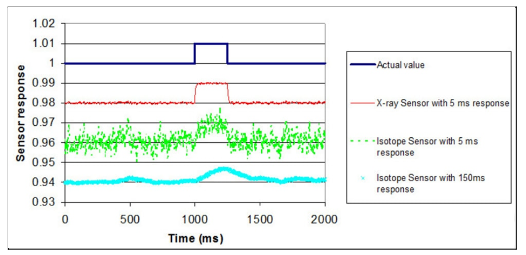
Another strategy for reducing noise in the isotope-based systems is to boost the reaction time. When something like this is done, small and instantaneous variations in the dimensions, such as the thickness of material, are dampened to the extent of being invisible. For a visual representation, see the accompanying illustration in Figure 1 below.

Figure 1: Sensor Response vs. Time
The sensor performance resulting from steel thicknesses for various photon energies are also shown in Figure 1 above.
Just like a minimal SNR value is critical when selecting a source, attention must be taken to find an energy source with an appropriate signal-to-noise relationship. While using a particular source type throughout several rolling mills may result in a slight spares inventory reduction, there are significant performance implications.
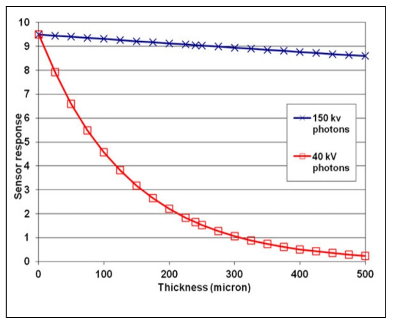
When an X-ray thickness gauge is operating at extraordinarily high energy, the dynamic spectrum of the sensor output is limited, which results in a reduction in measurement precision and efficiency. In the example of thin strip manufacture, material with thickness of roughly 250um (um = microns), a thickness change of 10um corresponds to a signal modification of about less than 0.2% at 150 keV, but the exact thickness variation translates into a signal variation of more than 7% at 40 keV.
Figure 2 below illustrates this point in more detail.

Figure 2: Sensor Response vs. Thickness
When statistical fluctuation in the scientific result is +/- 0.1%, it is clear that now the 150 keV supply is too powerful for the thin scrape operation.
